Distributing Java Desktop & Android projects with Github Actions
So you developed your Java app in Github — let’s get it out there! Setting up an automated deployment for both Android and Desktop is a simple matter of stringing together existing building blocks, so the latest release is always available to your users.
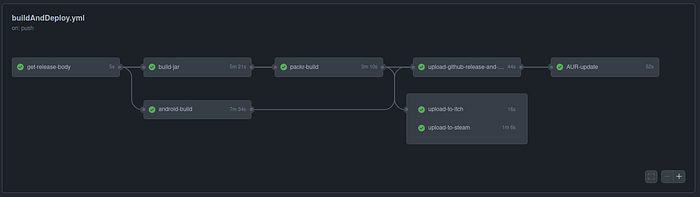
This example is taken from Unciv, which triggers releases for each tag, with a Discord announcement along with it. We’ve been releasing 2 versions a week for over 7 years, so we’ve streamlined the hell out of it :)
Desktop release process
- Generate a JAR
- Pack JAR into Linux/Windows/Mac-ready zip file using Packr (no JRE required for users!)
- Wrap Windows release into an MSI installer
- Upload to Itch.io/Steam/Github Release
Android Release Process
- Generate APK
- Sign APK for Google Play
- Upload to Google Play
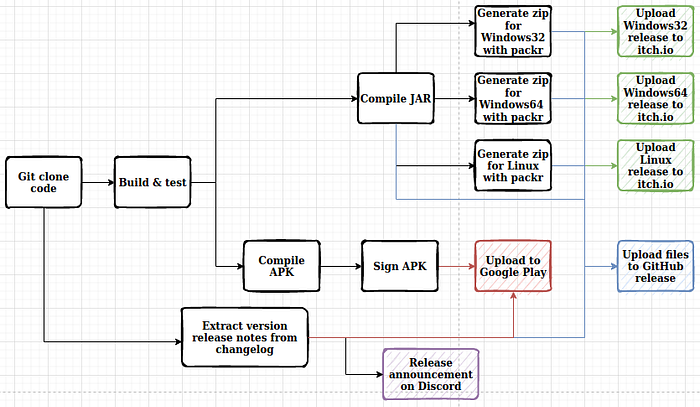
Basic pipeline — Code -> JAR -> Github release
Our MVP is some sort of runnable that users can download. The quickest way there is generating a JAR and using Github releases for distribution. In later steps we can make the process simpler for users and wrap that JAR into a self-contained executable.

Basic CI — clone, build and test
We’ll start with the basics - you can open the workflow file and follow the steps along with the explanation.
Every tag push triggers the workflow, as defined by the “on: push: tags” section. To start with, you can run all tasks in one job (if you want to parallelize later, you can split this into different jobs for different parts).
Assuming use of Gradle (Maven is similar in steps but different in details), you’ll be using Gradle for the build configuration and setup, and so we:
- Check out the code,
- Setting up the java environment,
- Set up Gradle, and then
- Run the build build process.
We run the build and test with the Gradle wrapper, using ./gradlew classes, check and tests:test to split the process into several steps, so we can follow the length of each step for optimization purposes. When running this locally we would just use ./gradlew build to run the first two commands together.
Desktop, stage 1 — creating the JAR file
We’ll jump forward in the file to the part that you’ll probably implement first — a working release file! In our case, this means bundling the .jar file, which is happily a built-in Gradle function, but we need to tell it to take files from:
- The Java/Kotlin libraries we reference (e.g. LibGDX itself)
- The classes we complied from the code — since we’re releasing for Desktop, this means classes from both Core and Desktop modules, but the Gradle magic deals with that by itself :)
- Assets — image files, jsons, etc, that the game loads when running
These are the basics — extra file sources will vary between applications, and are simple to add.
In Unciv, we also set the “Specification-Version” attribute of the JAR, so we can display the version to the user.
When you run the Gradle command (in this case, ./gradlew desktop:dist), you’ll get a .jar file in the desktop/build/libs folder, congratulations!
Uploading files to Github
Since we’re on Github, the easiest way to ‘get something out there’ is using a Github action. I personally use https://github.com/svenstaro/upload-release-action, but probably any would work well for your first upload (remember to star what you use!)
I recommend designating a folder, e.g. deploy, to hold all your uploadables, and setting the action to take all files. That way, as your pipeline increases, you’ll only need to copy new files to the folder to add them to the Github release.
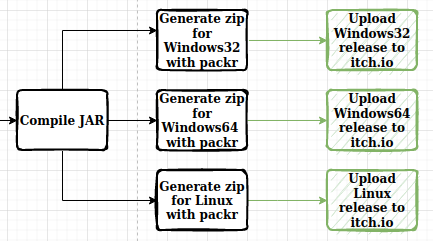
Stage 2 — Desktop releases for the average user, with packr and Itch.io
You’ve successfully launched your first release into the wild!
But your average user may not be able to use it. Running a JAR file has several requirements, which are trivial to you as a programmer but not necessarily for the user:
- Knowing the game exists
- Knowing the .jar file is in the release
- Having java installed on your computer (yes, this isn’t universal)
- Running
java -jar <filename>from the command line. This means opening the command line, which is something regular users never do (gasp!)
Discoverability score: 0, usability score: 0. Let’s try and up those numbers!
Creating user-ready releases with packr
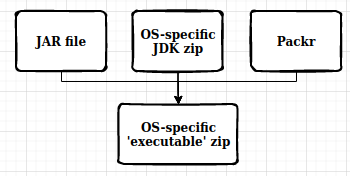
Packr is a CLI tool / magical construct that extracts the relevant parts of the JVM, bundles them up next to your code, and links them in a way that enables your application to run like a native app in Windows, Linux and MacOS.
Basically, it lets you convert your jar files to user-consumable folders. You’ll want to experiment with this tool on your computer and get everything working before using this in your CI/CD pipeline.
I personally use the following steps for most CLI pipeline experimentation:
- Make it work from your command line
- Make it work from a Gradle command, that wraps aforementioned command line
- Make it work from the Gradle command on the pipeline — this is where you discover that you have prerequisites on your computer you didn’t account for
Don’t be tempted to debug the pipeline directly until you absolutely have to! The lower down you get, the longer the iteration times are, so bugs are best found at the source. You can see how we call the packr tool from Gradle here, and how we download the packr tool and JDKs and call the Gradle function in the pipeline here.
Since we already set up our Github release, we can take all resulting zip files and just place them there to tick off our first box — Usability get!
Creating an itch.io release
Making a game means making something for people to play, but actually letting other people play your game can be scary. There’s a constant fear of “will people like this”, which is just a facade for two harder questions: “how will this affect my self-esteem” and “am I wasting my time”.
This may seem a bit scary, and it’s up to you to decide when you’re ready to do this, but I recommend as soon as you think it’s playable, a.k.a. “someone will enjoy this”.
Itch.io is the best venue I currently know for getting your game out there quickly. Sign up, upload your files, add a small description, and bam, you’re discoverable!
While you’re at it, add tags to increase your discoverability, and add an image —the user’s first impression will determine whether he even enters your game’s page, and you need to “convince” him to play it!
Once you have an itch.io page, and have uploaded your first release thanks to the new user-friendly folders, it’s time to automate!
To upload our releases to itch.io, we’ll use their CLI tool butler. Since our focus is on automating, there’s a slight rigamarole in setting up the authentication — you’ll need to set the environment variable of BUTLER_API_KEYin your repo’s settings -> secrets -> actions , and it’s probably best to test that this setup works for you locally as well. Once you do set it up, though, you probably won’t be touching it for years, because it Just Works (tm)
Since you’re releasing tagged commits, you can take the release name from the tag and add it to the itch.io release with --userversion ${{ github.ref_name }
Reading release notes and notifying Discord
If you have a Discord community, you’re probably notifying them manually on every release. Let’s automate!
Extracting your release notes
Users want to know what’s changed in the latest version, but none of them really care what happened before that, so your method of documenting release notes may vary. I personally use one large .md file, which both lets me search for specific changes / versions, see commit history, etc, all in one place.
When compiling a release, I read directly from the the changelog file, taking only those lines that appear between the latest release and the previous release, using some grep trickery. Here you’re entirely on your own, since this stage depends entirely on where and how you store your release notes.
One thing you’ll need to keep in mind, though, is that Github actions doesn’t by-default support multiline strings in environment variables. There’s a great explanation here, but the gist is you need to use one of two tricks to get around this. I do this by setting the value manually:
echo "RELEASE_BODY<<EOF" >> $GITHUB_ENV
echo "$r" >> $GITHUB_ENV
echo "EOF" >> $GITHUB_ENV
This takes the value of the string in $r and sets in in the environment variable RELEASE_BODY, so we can later use it anywhere in the pipeline as ${{env.RELEASE_BODY}}
Notifying Discord
Discord is built for webhook notifications, so as a Discord admin, setting one up is as simple as Edit channel -> Integrations -> Webhooks -> New webhook.
Setting this up with a Discord action (star!) is also really easy, making this the only step you can finish in literally 5 minutes :)
Additionally, now that we have the release notes in ${{env.RELEASE_BODY}, we can trivially add this to the Github releases as well!
If you want to notify a certain group, you’ll need to
- Enable Discord developer mode (user settings -> app settings/advanced) -> developer mode
- Find group mention, right click, “copy ID”
To actually @ the group, you’ll need to put it inside a <@&groupId> , like <@&123456789>
Android releases — Google Play and Github
APK upload
Gradle has two different actions related to Android. ./gradlew bundleRelease creates an Android App Bundle, or .aab file, which you can use to upload the Google Play. ./gradlew assembleRelease creates an Android Package, or .apk file, which you can use to install the game locally to your Android device. These follow similar steps, but both paths are entirely distinct.
You need to sign your APK before uploading, since may devices refuse to install unsigned APKs — There’s an Action for that (star!).
All in all: gradle assembleRelease, sign, move to Github release folder.
Google Play
Google Play release was definitely the most annoying setup of the entire CI/CD, so I’m going to assume you have an account set up, otherwise you should not be bothering with this at all.
You will need:
- https://github.com/r0adkll/upload-google-play (star!)
- Enable API access in
Settings > Developer Account > API Accessin Google Play Console - A service account — see https://developers.google.com/android-publisher/getting_started
- Google Cloud Platform IAM roles for the service account — Service Account User.
- Google Play Console — Users and Permissions > Users > Manage > Account permissions — Admin. (Checking all the “Releases” permissions did NOT work, and I couldn’t be bothered to boolean-test what exact permissions were required)
- Some patience for the guesswork required. There’s a lot of terms you’ll be seeing for the first time, and even after completing everything it’s hard for me to understand how the different pieces connect to each other
When all’s said and done, however, setting this up is a HUGE time saver. From the half an hour that releasing a version used to take, we’re now down to compiling the release notes, adding a tagged commit, and pushing.
Making a Windows Installer
Your application may be able to run as a standalone executable, but Windows users expect a better experience — a way to uninstall, a start menu shortcut, etc. This can be provided by wrapping your standalone folder in an MSI — Microsoft Installer — and providing that as the single file your users need.
Getting this right is a pain, so I created a Github Pipeline testbed to make it easier for you to get started :)
Of note: Apps don’t have write access to Program Files, which means your app needs to save its data in a different location than the installed files (e.g. AppData)
I do not recommend using the Microsoft Store. Not only is there no good automation if you don’t have an Azure account, they also enforce your MSI is signed by a “root Certificate Authority” (section 10.2.9) which basically means paying money for every release. No thank you!
Conclusion
Many guides show you how to get started with Github Actions, but very few show you how you can build a multi-step, multiplatform release process. Such a process must be built gradually, starting from the bare minimum and expanding to fit your needs.
I hope this helped you in your endeavors, and if you have any improvement suggestions, I’d be glad to hear from you!